1
2
3
4
5
6
7
8
9
10
11
12
13
14
15
16
17
18
19
20
21
22
23
24
25
26
27
28
29
30
31
32
33
34
35
36
37
38
39
40
41
42
43
44
45
46
47
48
49
50
51
52
53
54
55
56
57
58
59
60
61
62
63
64
65
66
67
68
69
70
71
72
73
74
75
76
77
78
79
80
81
82
83
84
85
86
87
88
89
90
91
92
93
94
95
96
97
98
99
100
101
102
103
104
105
106
107
108
109
110
111
112
113
114
115
116
117
118
119
120
121
122
123
124
125
126
127
128
129
130
131
132
133
134
135
136
137
138
139
140
141
142
143
144
145
146
147
148
149
150
151
152
153
154
155
156
157
158
159
160
161
162
163
164
165
166
167
168
169
170
171
172
173
174
175
176
177
178
179
180
181
182
183
184
185
186
187
188
189
190
191
192
193
194
|
# Kraken Pro Cloud BETA Status
This software is in BETA status. That means that it may have multiple bugs. We also do not guarantee any uptime for the service at this time. The server could crash and go offline for several hours to days at a time in the worst case. The server could lag if many people are using it.
**Before starting, please ensure you are on the latest code or on the latest image file for the Pi 4, Pi 5, Orange Pi 5 or Virtual Box.**
# Kraken Pro Cloud Features and Pricing
Currently, Kraken Pro Cloud and all its features are offered free of charge. However, we do intend on eventually moving towards a 'freemium' based model, where the basic features remain free, but advanced features such as history require an (affordable) subscription service. This is to help offset our development and server running costs.
We may also consider offering the server software itself as something that can be purchased, for people who wish to run their own private cloud mapper servers. If you wish to express your interest in this please email us at thekraken@krakenrf.com.
# Kraken Pro Cloud
[Kraken Pro Cloud (map.krakenrf.com](https://map.krakenrf.com) is our online cloud mapping solution for KrakenSDR devices. It allows you to upload KrakenSDR direction finding data onto our central server, so that you can combine bearing data from multiple geographically distributed KrakenSDR devices. With the right geography of the receivers and transmitter, this allows you to instantly determine the location of a transmitter without needing to take multiple readings with a vehicle.
## Geography and Positioning
At least two and ideally three or more KrakenSDRs spread out over some distance will be required. If you are detecting transmitters far away, the receivers will need to be spread out more in order to get good crossing of the bearings.
# Software Usage
Kraken Pro Cloud can be accessed by browsing to https://map.krakenrf.com. To sign up you will need to enter your email address and have the serial number of any KrakenSDR that you own. This is the 8 to 12-digit number printed under the CE/FCC/UKCA/NoBinning logos on the front-right of the device.
**KerberosSDR Owners:** KerberosSDR owners are also welcome to use this software. However as the KerberosSDR does not have a serial number, please email us at thekraken@krakenrf.com with proof of purchase details. We will then generate a serial number for you.
Once logged in your will be presented with a map and control sidebar.
## Adding a KrakenSDR
### Create a Remote SDR Station
To use the live bearing plotting features of the software you will need to add your KrakenSDR as a 'Remote SDR'.
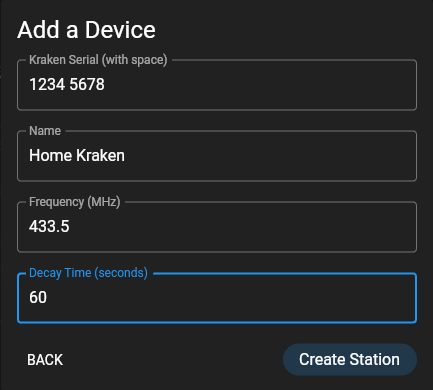
1. To do this, click on the `+` icon next to the 'Remote SDRs' text and select 'Remote Kraken'.

2. Enter the serial number of the KrakenSDR (don't forget the space), give it an easy to remember name (perhaps based on location), enter a default frequency, and the heatmap decay time you want (we recommend a default of 60 seconds).
The decay time setting defines how long data from this KrakenSDR will contribute to the heatmap. Generally, this could be anywhere from 10 to 120 seconds. Larger decay times result in more averaging over the grid space, and are useful if locating fixed stationary transmitters. Lower decay times result in more noise, but are required for moving transmitters. If your KrakenSDR is on a moving platform like a car, unless the TX is moving quickly, you probably want to set the decay time much larger (for example 30-60 minutes / 1800-3600 seconds), as then you do not want to lose the older data from points collected over time.
3. Once you have the details entered, click `Create Station`.
4. You should now see the station added on the left sidebar. Click the gear icon next to the newly added station.
5. Under the device settings heading you should see an `APIKey`. Copy this value and store it for the next section.

### Add the API Key to your Local KrakenSDR Software
Next, you will need to set up your local KrakenSDR software via its Web GUI.
1. First connect to the KrakenSDR's web GUI via its local IP address.
2. Under the `Station Information` settings box, enter a Station ID name and change the DOA Data Format to `Kraken Pro Remote`.
3. In `Kraken Pro Key`, paste in the `APIKey` that you got from the mapper in the previous section.
4. Change location source to `Static` and enter the Latitude, Longitude and Heading of the antenna array.
5. The settings should automatically apply and auto save.
6. Repeat the above "Create a Remote SDR Station" and "Add the API Key to your Local KrakenSDR Software" steps for as many KrakenSDRs as you are setting up. (Currently you are restricted to a maximum of three KrakenSDRs).
### Creating a Group
Next, you will want to group your KrakenSDRs. This step must be done, even if you are only going to create one group.
The grouping feature allows you to separate KrakenSDRs into distinct groups. KrakenSDRs in each group will plot on the same heatmap. This is useful if you have KrakenSDRs spread out over a country. When triangulating, you will likely only want the KrakenSDRs local to a signal to contribute to the heatmap, as KrakenSDRs in another part of the country may point to a different transmitter.
To create a group press the '+' button next to the 'Remote SDRs' text and click on 'Device Group'. Select a name for the grouping, and then select all the KrakenSDRs that you want in that group.
## Starting the Mapper
A few seconds after entering the API key into the KrakenSDR web GUI as explained in the previous section, you should notice that the KrakenSDR on the cloud mapper turns green.
Once all your KrakenSDR's are green you can now start visualizing data by clicking on the "Start" button.
After a few seconds, you should see the DOA lobe and bearing lines on the map. The heatmap should show up a few seconds later.
### KrakenSDR Remote Control
Each KrakenSDR can be remotely controlled individually or as a group by the cloud mapper.
To control an individual KrakenSDR, click the gear icon next to it. You will see all the settings available in the local KrakenSDR web GUI. To make a change, simply change a parameter and click 'Save'. After a few seconds, the remote KrakenSDR should update its local settings.
To control several KrakenSDR's in a group, click the gear icon next to the grouping's name. This is useful to synchronize multiple KrakenSDRs onto the same frequency.
### Granting Other Users Control
You can add authenticated users to your groups, or individual KrakenSDRs with either WATCH or FULL permissions. Any authenticated user with FULL permissions will be allowed to control your KrakenSDR settings. Any authenticated user with WATCH permissions will be allowed to access your DoA data, but not control the KrakenSDR.
To add an authenticated user, click the gear icon next to it, or next to a grouping. In the top right you can add the authenticated user via the email address they used to sign up to Kraken Pro Cloud.
The other user must have 'Enable Sharing' set in their Kraken Pro Cloud settings, which is also in the gear icon settings.

### KrakenSDR Multi-VFO
KrakenSDR is capable of outputting DoA data for multiple VFOs. If your KrakenSDR is set to output multiple VFOs, you can select which VFO gets displayed on the map by using the 'VFO Frequency' drop-down box. For each VFO frequency, there should be one entry in the drop-down box that can be selected.
## History
The cloud mapper is capable of playing back data received over 24 hours. As long as your KrakenSDR is online, and has the KrakenSDR showing green in the cloud mapper, data is constantly being recorded. Currently, data is recorded for a week, anything older than a week is deleted.
_The 24 hour playback timeframe and week long data retention may change in the future depending on how much server load this causes. Longer timeframes may become an (affordable) paid subscription feature in the future to help offset server running costs._
1. To access the history feature, click the rewinding clock icon  at the top, under your customer name, and then on the popup click 'Switch'.
2. Select the grouping, or individual KrakenSDRs that you would like to be part of the playback by clicking on their names to place the blue circle around the green connected icon.
3. Select the timeframe that you would like to playback. Currently, 24 hours is the maximum length of time that can be selected. The timezone used is your local browser timezone.
4. Select the VFO Frequency that you would like to playback.
5. Select the heatmap decay time. Currently, choices of 1 minute to 10 minutes are possible.
6. Now to playback at 1x speed (1 second = 1 decay interval), press the play button.
The timeline will display a red and green bar just above it. Red indicates that that time has no bearing data (where data was perhaps squelched). Green indicates that bearing data is available.
If you want to playback at a faster timelapse speed, you must first precompute the heatmap data for this time frame. To do this, click on the 'Precompute Heatmap' button. This may take a few minutes to complete. Once completed, you will be able to select a playback speed of 2x, 4x or 8x.
The gif animation below shows heatmap playback at 4x speed while the KrakenSDR was tracking the bearing towards a weather balloon.

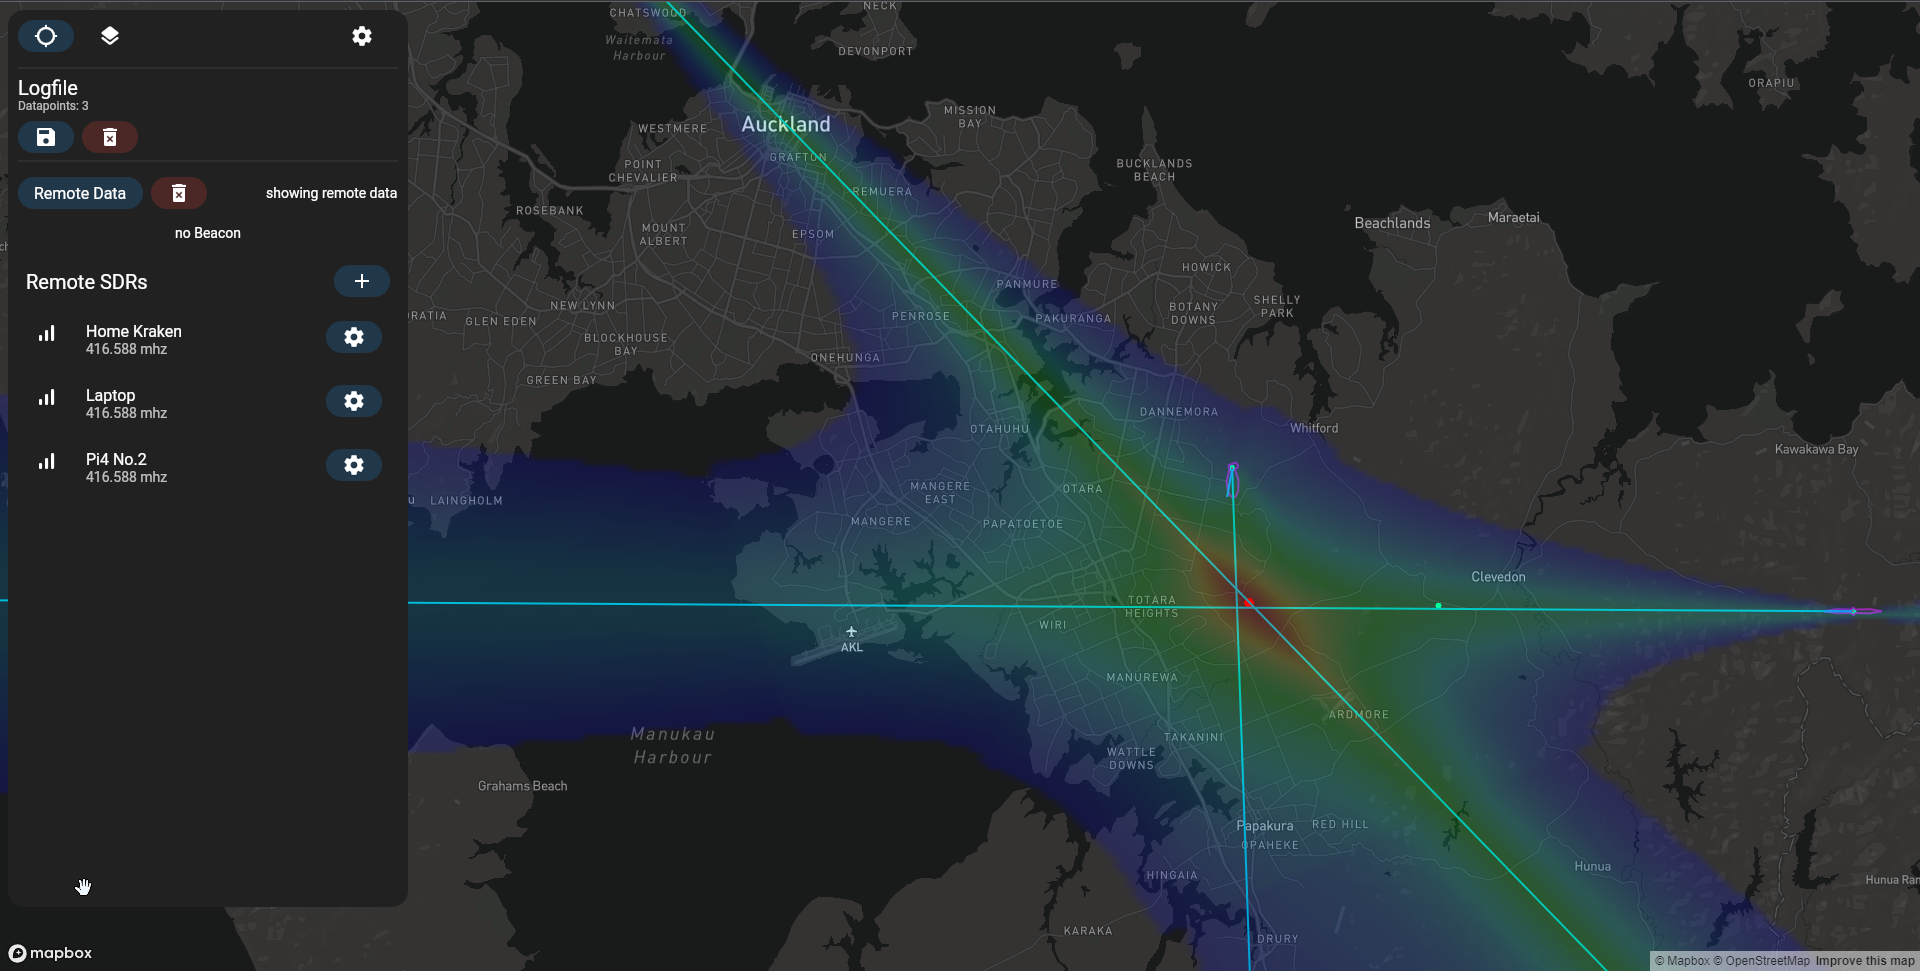
## Offline Log Files
Kraken Pro Cloud can be used to visualize logs produced directly from the KrakenSDR core software created in the web GUI via the Local Data Recording feature, or for logs saved via the Android App.
1. To access the offline log files plotting menu, click on the file icon  under your customer name and then click 'Switch' on the popup.
2. To open a log file click on the folder icon next to the 'Log Files' text. Choose your .csv log file and click open.
3. If the file contains multi-VFOs, select the VFO you are interested in.
4. After a few moments, you should see the logfile load in. The heatmap calculation may take a few moments longer if the log file is large.

You can click on individual data points on the map for more information about that particular point, as well as a drawing of the lobe.
## Other Options and Features
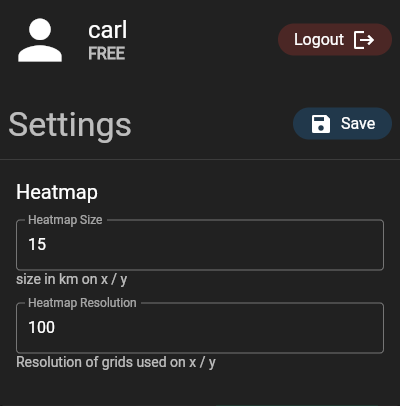
### Main configure button (blue gear icon at the top)
**Heatmap Size:** Total size from edge to edge in kilometers of the heatmap grid. Set this appropriately for your expected search space. Too large and you will lose resolution. Too small and you may have difficulting visualizing the lobe intersections.
**Heatmap Resolution:** Number of cells per axis on the grid. A higher value can result in more precise TX localization. But setting it too high can make calculations too slow. Maximum resolution is currently capped at 250.
It's important to note that setting a smaller heatmap size naturally results in a higher resolution grid. For example, if you set your grid to 100km and resolution to 500, each grid cell has a size of 100,000/500 = 200 x 200 meters.
Now if you set the grid size to 10km, each cell has a size of 20 x 20 meters.
### Double Click Menu
If you double-click on the map a menu will pop up.

**Add Marker:** Adds a reference marker on the map. Useful for marking the location of known transmitters.
**Center Heatmap:** Centers the heatmap grid wherever you click.
**Set as Home:** Tells the mapper where on the map the mapper should default to upon load.
**Copy Lat, Lon:** Copies to the clipboard the current latitude and longitude of the point you double clicked at.
**Open in Google Maps:** Open the coordinates where you double clicked in Google Maps. This may be useful if you want to use street view.
### Layer Options
Layer options can be accessed via the layers button  on the top right.
This allows you to choose between a light or dark street map, or a satellite image map.
## Externally Controlled Markers
You can upload coordinate data to the KrakenSDR server and have it plotted as a marker on the map. This is useful for verifying a KrakenSDR setup, for example by driving around your target area with a beacon and GPS, or using a weather balloon radiosonde.
A Python script that shows an example of how to upload data to the server can be found at https://github.com/krakenrf/krakensdr_docs/blob/main/misc_scripts/sondehub_krakenmap.py. The script uses the SondeHub API to receive the GPS coordinates of a weather balloon. The GPS coordinates are then forwarded to the Kraken Pro Cloud server.
# Future Features
Our developer is currently working on new advanced features, some of which may require a subscription payment. These features include:
- Object Tracking: The ability to automatically track an object.
- More than three KrakenSDRs
- Beacon ID: The ability to track KrakenSDR beacons that may be transmitting unique IDs but on the same frequency.
|
